Functional performance of any solid surface relies on the physical conditions and chemical composition of the concerned surface and subsurface layers. Quality is defined as fit for intended purpose. Similarly, quality of a solid surface is one subjective matter and its assessment primarily depends on intended functionalities. Let us explain the same with examples. With respect to decorative artefact, appearance of the surface has importance rather than presence of micro-cracks on surface or sub-surface (such cracks can be easily filled by good quality coating or coloring). However, if we consider one metallic structural member then strength, hardness, anti-corrosiveness, etc. become dominating factors and consequently presence of cracks, micro-cracks, holes, defects, etc. determines surface quality of the concerned structural member.
These are three terms, namely surface roughness, surface finish and surface integrity, which are commonly used to define the quality of the surface of manufactured product. Sometimes they are used interchangeably, but they are not exactly same. Roughness and finish imply the same thing but in different way; whereas integrity has a broad domain and encompasses the former two. Their differences with respect to manufactured products are discussed in following sections.
What is surface finish? How it is related with surface roughness?
Smoothness of a surface is determined by surface finish. It indirectly indicates height and depth of asperities of the solid surface. No surface is perfectly smooth; even if it is perfectly smooth, it cannot be determined as every measuring instrument has a range of its capability. Looking on a surface in bare eye may not reveal asperities; however, a magnified view of solid surface will reveal such peaks and valleys, as shown below for a surface after grinding (abrasive finishing).

Surface roughness is the quantitative approach of determining smoothness of a surface by measuring height of such peaks and depth of such valleys over a fixed length. There are various principles of measuring roughness; however, all follow the aforementioned basic approach. For example, average surface roughness (Ra), 10 point average (R10), root means square (Rz), etc. Whatever be the case, roughness can quantitatively determine the profile of a solid surface and is one crucial parameter of surface texture. A particular manufacturing process has the capability to provide certain level of roughness and therefore machining (surface modification) process should be selected based on the intended roughness. Usually secondary manufacturing processes, such as machining, tend to provide a smoother surface. There also exist many processes (like lapping, buffing, superfinishing, ion beam machining, etc.) that are exclusively used to reduce surface roughness of a component rather than bulk removal of material.
Unlike surface roughness, surface finish is one qualitative approach of indicating smoothness of a surface. In fact, roughness and finish are inversely proportional. Thus lower the roughness, better is the finish. Attributes like poor, bad, good, fine, smooth, etc. are used to express surface finish rather than an exact numerical value (like 100nm). Thus it is affected by human bias. It is worth mentioning that roughness and finish are localized factors and don’t take care of entire surface. There are many other surface profile parameters such as waviness, texture, etc. for the same.
What is surface integrity? Which parameters come under this?
Surface integrity encompasses all of the elements that describe all conditions of existing solid surface. It takes care of not only surface topography but also metallurgical aspects of the surface and sub-surface. The concept of surface integrity was introduced by Field and Kahles in 1964 and they defined surface integrity as the inherent or enhanced condition of a surface produced in machining or other surface generation operation. Every surface generation or modification process is associated with the alteration of various properties including roughness, plastic deformation, micro-cracking, phase transformations, micro-hardness, residual stress, etc. Thus surface integrity takes care of such alteration.
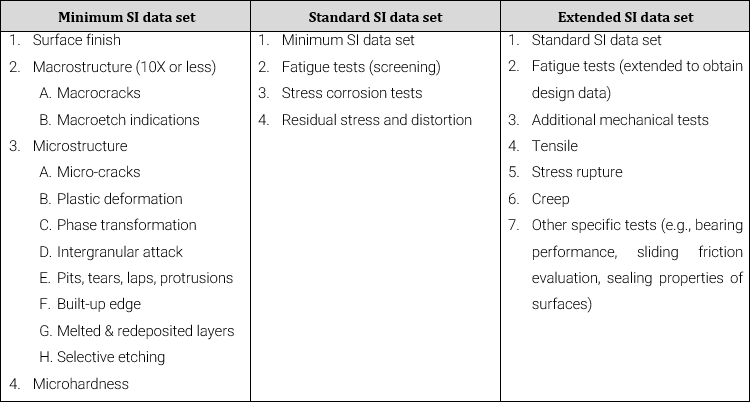
There exist a standard dataset for surface integrity (SI) prepared by Field et al. (1972) as given below. Surface finish is one important factor that come under this data set. In fact, finish is first and foremost parameter in integrity data set.
Set-1: Minimum SI data set (MDS)
- Surface finish
- Macrostructure (10X or less)
- Macrocracks
- Macroetch indications
- Microstructure
- Microcracks
- Plastic deformation
- Phase transformation
- Intergranular attack
- Pits, tears, laps, protrusions
- Built-up edge
- Melted and redeposited layers
- Selective etching
- Microhardness
Set-2: Standard SI data set (SDS)
- Minimum SI data set
- Fatigue tests (screening)
- Stress corrosion tests
- Residual stress and distortion
Set-3: Extended SI data set (EDS)
- Standard SI data set
- Fatigue tests (extended to obtain design data)
- Additional mechanical tests
- Tensile
- Stress rupture
- Creep
- Other specific tests (e.g., bearing performance, sliding friction evaluation, sealing properties of surfaces)

How surface finish differs from surface integrity?
Surface finish is one parameter of surface topography that indicates smoothness of a solid surface. It is one qualitative approach of designating quality of a surface of manufactured product. On the other hand, surface integrity has a broad domain and consists of all surface topography parameters as well as surface and sub-surface metallurgical parameters. Integrity encompasses surface finish, micro-crack, plastic deformation, phase transformation, melted and redeposited layers, microhardness, residual stress, distortion, creep, etc. Therefore, surface finish is just one element of surface integrity set.
Scientific comparison among surface finish and surface integrity of machined products is presented in this article. The author also suggests you to go through the following references for better understanding of the topic.
- Kaynak et al. (2014); Cryogenic Machining-Induced Surface Integrity: A Review and Comparison with Dry, MQL, and Flood-Cooled Machining; Machining Science and Technology.
- Bellows and D. N. Tishler (1970); Introduction to surface integrity; General Electric.

